Wednesday, August 29, 2018

It's been YEARS since I've posted anything on this blog, but I'm launching an online store and I want to have all my bases covered, lol! So, without further ado...

Please visit me at ItsYourThing.biz or if you've come to my blog from the store, WELCOME!

I'll be posting new and exciting things soon!

Monday, January 9, 2012

Welcome to 2012!

Happy belated New Year! One of my resolutions for the new year is to update my blog at least once a week - 2011 was NOT an exceptionally craft-filled year for me and I have decided that this year will be different: I WILL set aside time every week to create something handmade and use up many of the supplies that I have in my awesome craft studio.

Week one of the new year has been devoted to reorganizing my craft studio - the dream room that my ex-boyfriend Tom and I designed and he built back in June of 2010. It's taken me that long to figure out where everything should be so that I can really create in a functional space without having to look for the things I need. I finally have my "most used tools" within reach of the area that I use most as my work space. This includes my GlueGlider Pros, craft knife, craft pick, TweezerBees, my brand new Tonic Studios Scissors (how did I live without these???), Zig 2-way Glue (all sizes),  Zig Millennium Pens, rulers, stickles, paper trimmer, bone folders, crop-o-dile, zots, red-line tape, foam dots, Prima flowers, Heat It gun, sanding blocks, Copic Markers and other tools I use frequently when I craft. A few years ago I had bought a locker shelf for one of my daughters - it never was used so I put it to work to help organize this space, as pictured below:


I also have a spinning rack that was purchased for bottles of acrylic paint, but I repurposed it to hold my Adirondack acrylic paint dabbers, glimmer mists, Perfect Pearls mists, Distress stains, and ModPodge bottles:


Below my most used tools are those cool storage cubes you can find at most craft stores. I have them stacked two high and 5 across and they hold loose single sheet patterned papers, card stock and assorted embellishments. I find it very useful to have these products within reach when I'm working.


Tim Holtz Distress inks are all neatly stored behind my non-stick craft sheet and the handy Ranger Inkssentials Craft Spinner Ink Blending Tool Storage rack which holds labeled blending tools for each color family:


The little shelving unit above also houses my embossing powders, inks and assorted stamping products.

Across the room are 2 pegboards: one holds embellishment products such as Tim Holtz idea-ology products, gemstones and other bling, grungeboard, boa trim, Jolee stickers, metal charms and the like:


The second pegboard is actually a garage type workbench with a lighted hutch top. It was hanging out in my garage doing absolutely nothing so it was moved into my craft studio where it now holds my other not-so-often used tools like decorative edged scissors, alcohol inks, shaped brads, hot glue guns, painters tape, magnets, distress paint, as well as backup supplies like Zig 2-ways, replacement blades and perfect pearls. I know where they are when I need them, but I'm no longer sorting through everything to find just what I need most often.  This works exceptionally well for me. The bottom half of the workbench is divided into two units: one is a two-door shelved cabinet and the other is a 3-drawer unit that organizes my painting supplies, polymer clay supplies and my "F" drawer that holds my fake fur, felt and feathers :)


That's just a small part of my craft studio tour - tomorrow we'll explore a little more of my creative space, and (hopefully) I can share another resolution that I'm working really hard to make happen :)

Thanks for visiting and...

Happy crafting,
Barb!

Sunday, July 17, 2011

UTEE flowers

It's been forever since my last post, or at least it seems that long. I've been in a creative funk lately, but I think I've been able to shake it and get back to what I love to do, craft!


I was checking out YouTube videos looking for paper flower tutorials when I came across a video that caught my attention (here it is). "Faux Porcelain Flowers" by Sherry Cheever, I was intrigued... I watched that video a few times, and kept thinking, how cool would the flowers from the Mother's Day Bouquet Cricut cartridge look done in the same way. I had seen jars of UTEE (Ultra Thick Embossing Enamel) in craft stores and a local scrap shop or two, but never really knew what to use it for. I have embossing powders and don't really use them very often, so I figured this was just a more expensive embossing product that I wouldn't use - oh was I wrong!


I printed off my AC Moore coupon and off to the store I went to pick up some UTEE and a Melting Pot. ACM had the UTEE (which I bought), but didn't have the Melting Pot, so I cruised on down to Michael's and found it there. 


Enough story telling, here's my first UTEE project:


Aren't those flowers fun? Here's how I made them:


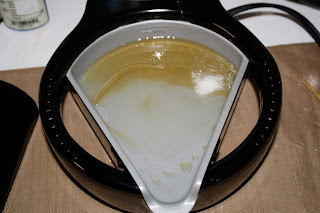
Pour some UTEE into the Melting Pot


And watch it melt... You should cover the pot with the lid provided, it will speed up the melting process.


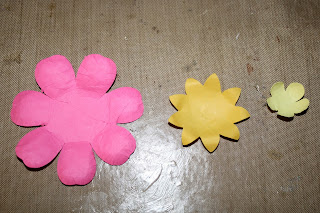
While the UTEE melts, give your paper pieces dimension by using an embossing stylus to either make lines in leaves, or as I did in the layers pictured below, go along the back side of the paper in a circular motion along the edges of each petal. This will make the petals curl. I also rolled the yellow layer's pointed edges over a bamboo skewer to make them curl.


Once you have the petals formed and your UTEE has melted, drop them into the pot and swirl them around to make sure you have coverage on all sides. 


Be sure to flip your pieces over :)


Take the UTEE covered pieces out and let them cool on your non-stick heat-resistant craft mat (a "must have" for this technique!) Note: the UTEE doesn't dry clear, so expect some yellowing of your pieces. I used very bright colors and the finished project doesn't look too bright.


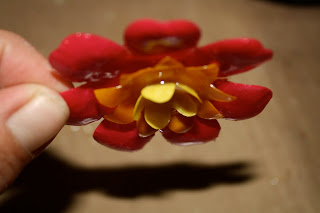
After the pieces have cooled, stack them together in a way that looks good to you. When you have them in the right place, hold them together with a skewer and using your heat gun, re-heat the stack. 


As you can see in the picture below, the layers will melt together and become attached.


Even upside down it stays together :)


Now, I have to say that for one of the flowers, I had to use a hot glue gun to keep the center attached. It worked great!


The picture below was the first flower I made - my very first UTEE project. I love how it came out. The cartridge I used was the Mother's Day Bouquet.


Here's a close-up of the flower grouping. 


I used Tim Holtz corked vials filled with sand and teenie-tiny shells we found that day on the beach.


The base of the wall hanging was cut from the Lacy Labels Cricut Lite cartridge cut as large as it would fit on my mat. I used my Gypsy to change the dimensions (height/width) slightly and then made a second one slightly smaller so I would have a nice border. I used Colorbok whiteboard for the base, but I also used Colorbok chipboard underneath it, which I had to cut by hand as it's just too thick for my Expression to cut. 


Papers I used were "Backyard Splash" by American Crafts (waves) and "Caribbean" by Reminisce (the "Paradise" collection). The dotted paper for the photo mat was from an older DCWV Summer Stack.


I have to admit, the layout was scraplifted from Sherry as well (she's awfully talented!) 


Thanks for stopping by and...


Happy crafting!
Barb

Saturday, February 26, 2011

Fabulous & 50 Blog Hop - TODAY!!!

Hi and thanks for stopping by!


If you are here for Angie's Paper Passion's 50th Birthday Blog Hop and you have just come from visiting Michelle at http://paperaffair.blogspot.com/ then you're in the right place! If you've just happened across my blog and would like to play along with our fun hop, you can go to http://angiespaperpassion.blogspot.com/ and start at the beginning.


Here is the complete list of participants to help you on your way:


Angie - http://angiespaperpassion.blogspot.com/
Dawn - 
http://scrappyrn-scrappyrn.blogspot.com/
Janice - 
http://www.cricutconfessions.com/
Normea - 
http://mmdezigns.blogspot.com/
Nancy - 
http://lanancyworkshop.blogspot.com/
Michelle - 
http://paperaffair.blogspot.com/
Barb - 
http://craftinginparadise.blogspot.com/ <- YOU ARE HERE!
Debbie - 
http://www.debseclecticthoughts.blogspot.com/
Marcia - 
http://scrappin-times.blogspot.com/
Veronica - 
http://www.iteachscraps.blogspot.com/
TinaGale - 
http://tiggersscrapplace.blogspot.com/
Monique - 
http://mixonthememories.blogspot.com/


My birthday project for the blog hop is a fun way for my beautiful daughter Ashley to organize the photos from her 21st birthday trip we took to Key West Florida last month - what a blast we had!


The inspiration for this mini came from Kathy Orta's Paper Phenomenom - Kathy is one talented lady!!! 


Here's a photo of my take on Kathy's mini:
I haven't embellished it or added photos yet because I want to see which photos Ashley wants to include. 


I used papers from Paper Pizazz "Retro Sarapapers" for the inside pages, Glimmer papers for the title letters ("Happy Birthday"), and the cardstock used on the tags and box are ProvoCraft Accentials. Cricut cartridges used were Tags, Bags, Boxes and More, Alphalicious, and Forever Young (these cuts are not pictured) to cut some fun phrases that Ashley can add to the appropriate photos. 


Here's additional views of the mini:


I will post more pictures after the mini is completed with the embellishments and bling by next weekend. I hope you can stop by again to see the completed project :)


I hope you like my project & will become a follower of my blog.


If you would like to see a YouTube video on how to make your own paper bag mini like this, go to http://www.youtube.com/watch?v=YgOCLtAJxw4


If you are continuing on to the next stop in the Fabulous and 50 Blog Hop you can get there by clicking here.


Happy birthday Angie!!!


Have a creative day!
Barb

Tuesday, February 22, 2011

Fabulous & 50 Blog Hop


I've been MIA for almost a year (YIKES) but that doesn't mean I haven't been crafting :) 


My Cricut Demo Army friend Angie is celebrating her 50th Birthday on Saturday, February 26th with a "Fabulous & 50 Blog Hop" and I'm honored to be one of the 12 blogs in the hop. I hope you stop by and check out the crafty birthday projects these talented ladies have created.


Have a creative day,
Barb

Wednesday, May 12, 2010

Practical Scrappers DT Challenge: Punches

The challenge this week at Practical Scrappers was to use punches. Since the purchase of my Cricut machines 2 years ago, my punches see more dust than action however my collection of circle Paper Shapers by EK Success are truly my "go-to" tools on a regular basis.

My "Hope Rocks The Beach" layout is a very simple page, with lots of photos from a fundraiser on Fort Myers Beach that I co-chaired a year and a half ago. I used a photo collage template from Scrapbooks Etc to include a bunch of pictures but still maintain a clean design.


My circle punch was used for the number labels that correspond with the numbered list on the right of the LO. I feel horrible when years after taking a picture, I forget the details, so by listing everyone in this manner, I can remember all the FABULOUS people who stepped up to help out a good cause (and had a lot of fun doing it!)

That's all for this week, but come back and visit next Wednesday to see what the DT has in store...

Happy crafting,
Barb!

Monday, May 3, 2010

One of my fave LO's

On Practical Scrapper's message board, there is a Question of the Day thread asking to share/show your favorite scrapbooking page that you've done that shows a little bit of your style and tell us why it's your favorite. Sounds like a good excuse to post one of my favorite layouts that I have ever done.

Here it is:


I used the menu/mask from the photos as a template for the paper-pieced parrot on the left page. The title "my keets" is short for "parakeets" which is what the children of Parrot Heads are called, is just letters that I drew and cut by hand (this LO was done BmC... Before my Cricut). The beak is yellow card stock that I chalked to give it dimension. On the right edge near the tip of the beak, I wrote lift here... this will reveal my hidden journaling. Because the layout is about a trip to Orlando's Margaritaville, the story is written using Jimmy Buffett song titles (ALL GREEN CAPS) and is shaped like the beak! Here is the journaling:

Hoping to BRING BACK THE
MAGIC, the kids and I decided to
TAKE ANOTHER ROAD to go
Christmas shopping. CHANGES IN
LATITUDES CHANGES IN ATTITUDES
was something this family certainly
needed. A HOLIDAY in Orlando would
surely make us feel like BAREFOOT
CHILDREN IN THE RAIN. In my quest
to be INCOMMUNICADO, I left a
message on my answering machine:
“BABY’S GONE SHOPPIN’. Leave a
message after the beep.”

We spent a SUNNY AFTERNOON having
a blast SPENDING MONEY (remember I
USED TO HAVE MONEY ONE TIME).
After an entire day of LIVIN’ IT UP we
realized we were hungry, so we headed
to MARGARITAVILLE for a
CHEESEBURGER IN PARADISE. We
knew that COME MONDAY it would
be back to our CARNIVAL WORLD,
which made us WONDER WHY
WE EVER GO HOME. I know
it’s CLICHÉ but don’t we all
want to live HAPPILY EVER
AFTER (NOW AND THEN)?

Although it’s really a
SEMI-TRUE STORY I’ll
end with THAT’S MY
STORY & I’M
STICKIN’ WITH
IT!

On the right page, I used the Margaritaville logo behind my kids as inspiration for the sunset / palm trees paper-piecing. Again, lots of chalk was used for the sun. The title letters for "Margaritaville" was copied from my late husband's favorite t-shirt - a margarita spilling out forming the letters. I outlined each letter with a black glaze pen, added white glaze pen highlights and cut around the entire word. There are spots that I found too intricate to cut out, so I colored them in with black marker, but you really have to look closely to see it.

Hope you like it and thanks for stopping by!

Happy crafting,
Barb