Showing posts with label Scrapbooking Goodies. Show all posts

Tuesday, March 16, 2010

Cruise Word / Shape Book

I am submitting this Word / Shape book as an additional Practical Scrappers project for the Chipboard Challenge:


This is a book that I made for my Cricut DesignStudio 102 class that I will be teaching later this month at Scrapbooking Goodies in Cape Coral FL. In this 2-part class, I will be showing students how to create their own unique word / shape book. This is an example of one of the many different formats that they can use and I will have other types on display at the store so they can decide which type they would like to make.

The cardstock is all Core'dinations and I chose that because of it's thickness - something that I think is very important for these shape / word books. I used recycled cereal boxes and Pepsi can 12-pack boxes for each page, spraying each piece with Archival Mist to make it acid free. Each page was cut twice from CS and once from the recycled box "chipboard".

The first page is the welded title letters for the book - in this example "Cruise". I used George for the rectangle on the left side of the page, and Life is a Beach for the letters and wave. I used a new type of Core'dinations for the wave - "Gemstones"... be sure to look for these beauties at your LSS!


The second page is pockets that hold tags that I made from tags bags boxes and more and my ship credit card. You may not be able to tell from the photo but there are actually 2 rows of pockets. The back side of every page (not shown) also have "Gemstones" waves that act as a pocket for photos or tags.

Page 3 is a cruise ship from Life is a beach (LiaB). Simple page, no real plans for photos or journaling, but they could be added.


The next page is dolphins from LiaB - again, nothing special here except flipping an image, adding some welded circles & rectangles so there isn't so many cut-out areas and basic layering / paper-piecing. I wanted more uncut areas on the back to hold more pictures / journaling tags.

Here are the happy dolphins:


I decided to add a full page after the dolphin page with a beach and palm tree. The "beach" is another pocket. If you look closely you will see a new product that I just had to try - Mudd Puddles! You can get more information from their website, but it is pre-mixed glue and sand that you spread with a knife on your project, just like frosting a cake. Once it is dry, it will not crack, flake, or peel off and it's extremely flexible PLUS it's acid-free... very cool stuff!

I used 2 different colors on this page: Malibu (sand) and Marine (water).


Finally on the last shape page I used more Mudd Puddles on a sandcastle cut from Everyday Paper Dolls. This time I chose "Bahama Beach" sand and after it dried, I inked the edges with some walnut stain distress ink applied to a fantastix, as well as adding a few faux shadows on the turrets and towers.


To finish the book off, I ended with a blue full page that I can adhere photos to.

Thanks for visiting my blog. Please leave a comment and let me know what you think about my book.

Happy crafting,
Barb

Friday, March 5, 2010

02/10 Scrapbooking Goodies' DT Challenge: Black Magic, Whitewash & Core Essentials Core'dinations

For February 2010 the Scrapbooking Goodies Design Team challenge was to use Core'dinations Black Magic, Whitewash and Core Essentials cardstock on a layout or card, but the REAL challenge was to use as many different techniques as possible with the cardstock: antique it, sand it, tear it, emboss it - don't JUST use it as CS.

With all that in mind, here is my layout using all those techniques, with one additional trick "sanding using a template" added in that I will explain a little further in this post:

The CS colors I chose for this layout are Whitewash Window Pane, Whitewash Cellar Door, and Core Essentials Marine Blue. I did another non-related layout using Black Magic that I am submitting for next week's Practical Scrappers' DT challenge but I can't go into the techniques I used on that page until Wednesday...

To create the background image, I cut a road sign from my "Street Sign" cricut cartridge at fit to page. I used a repositionable adhesive to keep the shape in place on the Whitewash Window Pane CS and sanded around the outside edge of the paper, leaving just the sign shape as white and revealing the black core along the outer edge (additional technique: sanding using a template). To give the shape of the road sign more definition, I traced the outline with a Zig Millinnium black marker. I felt that it made it stand out better.

To give the photo mats a little variety, I ran Whitewash Cellar Door CS through my Cuttlebug using a D'vine Swirls embossing folder, then I sanded the embossed areas to reveal the blue core (technique: embossing).

The subtitle letters (headin' down) were cut on my cricut using the Sans Serif cartridge and the title letters (US1) were cut using Street Sign. "Wish you were here" is a phrase from the Going Places cartridge.

The oversized mat was done by tearing and layering whitewash Cellar Door and core essentials Marine Blue CS. The tag was created by adhering scraps of the embossed, and torn CS as well as a small scrap that I crumpled up, smoothed out and then sanded (technique: antiquing) to a store bought tag. A scrap of sheer ribbon was looped through and the tag was 3d Foam dotted onto the layout.

While this layout is simple and basic, it does show a lot of different uses for Core'dinations cardstock. Check back on Wednesday to see another layout using Black Magic, Whitewash and core essentials CS.

With the DT submissions all in at Scrapbooking Goodies, it is now time for the store customers to take the challenge. We're challenging the customers to bring in their Core'dinations project using as many techniques possible with these 3 types of CS. One lucky customer will win a package of Core'dinations CS from the store. No email or online submissions accepted - in-store only.

Next month's SG DT challenge is Embossing - dry, heat, Cuttlebug, whatever...

Thanks for stopping by and...

Happy crafting,
Barb

Monday, February 1, 2010

01/10 Scrapbooking Goodies' DT Challenge: Theme of your choice!

The DT challenge for January was to pick any theme and do a card or layout using products from the store... SIMPLE! Well, seeing that I am at the store quite frequently and I am the store owner Teresa's go-to girl for opinions, thoughts, suggestions and assistance she often times tells me what she would like me to do for the challenge - or even selects the materials she wants me to use. January was no exception :) Her sample layouts using "dog" themed products were very basic and limited (I think there is 1 in the store) so she asked me to do a dog layout. I think she wanted me to do a layout for our new puppy Treble, but that will have to wait.

Here is my layout for January 2010:

Left page

Right Page:

The patterned papers and stickers are from Reminisce's "Good Boy" collection - a very cool line with double-sided papers that can be used for many type of layouts - not just dogs. The masculine stripes and the rich warm colors make this collection a real winner for me.

Title letters were cut using All Mixed Up (Emily) and Plantin Schoolbook (The Destroyer) and the paw prints were cut from Mickey and Friends. Tags were cut from Tags, Bags, Boxes and More.

I think the journaling is super funny! I did it from Emily's perspective, as if she dictated her story to me and I just typed it up for her. Here's a couple of close-ups...

Left page:
Right Page:

The tags all pull out and have "evidence" photos of a few of the things Emily has destroyed. I will be changing the ribbon pulls when I bring this into the store. The sheer ribbon keeps sliding off the tags and I'm not 100% happy with the way it looks. The tags were distressed with Tim Holtz distress inks (spiced marmalade, aged mahogany, brushed corduroy, vintage photo and walnut stain - yep ALL 5 of them)

The tag holder was made by using a #10 business size envelope. I have seen this done a couple of times on a couple of blogs and directions can be found by watching this YouTube Video from Following the Papertrail. She's got a lot of very cool things on her blog... check her out when you get a chance. You won't be disappointed!


This last photo is an accordian fold mini-album that holds 7 additional photos, all tied together with a beautiful satin maroon and tan ribbon.


This 2-page spread holds 16, yes SIXTEEN photos! It was a lot of fun to make and it may be one of my favorites.

Next month's SG Design Team Challenge: "Ebony and Ivory" use Core'dinations Black Magic and Whitewash cardstock for a layout or card.

Happy crafting,
Barb!

Wednesday, January 13, 2010

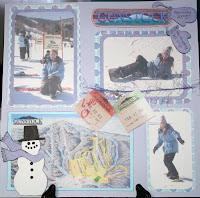
12/09 Scrapbooking Goodies' DT Challenge: create a layout using a Fairytale Creations chalking template


This month's DT challenge was to use a Fairytale Creations chalking template on a layout using any medium or technique of your choice. Although I like chalk to add details to paper-piecings and diecuts, I much prefer to use these templates to create paper-pieced embellies!

I chose the "Snow Day" template to use for skiing pictures from a trip to Gunstock NH back in 2003.

Using Core'dinations cs, I paperpieced the skis, snowman, mittens, and scarf, inked the edges with a black Stazon and added detail with a Zig Millenium marker. I created the snowflakes using an EK Success light blue colored pencil to trace the shape, then applyied "waterfall" stickles to make them sparkle and shine! The title letters were cut from core'dinations cs in design studio using Winter Woodland cartridge. I used "Frosty Dots" from the Reminisce Holiday Leftovers Collection papers for my photo mats. Adding scans of ski-tags and Gunstock map helped me to complete the layout without buying more supplies... bonus!

Next month's SG Design Team Challenge: "Create a theme layout of your choice".

Happy crafting,
Barb!

11/09 Scrapbooking Goodies' DT Challenge: create an "About Me" layout

This was such a fun challenge and something that I have wanted to do for a very long time!

I chose to do a spinner page for the left page and tags tucked in to a pocket for the right page. I am a HUGE fan of hidden journaling, so these 2 techniques had to be included in an "all about me" layout :)

I created the spinner element in Cricut Design Studio (CDS) using George and Basic Shapes and Accent Essentials cartridges, but I hand cut the pie shaped spinner opening. The title letters were welded in CDS using Alphalicious and shadow feature, then layering the base letters after they were cut. I used my CuttleBug and the Swiss Dots folder to emboss the center circle. The paper flowers were ones that I had in my stash that I just had to use!

The pocket page was also created in CDS using Alphalicious for the letters, Everyday Paper Dolls for the pocket (it's actually a road on the cart!) and Tags, Bags, Boxes and more for the tags and flowers on the top of each, but then more paper flowers from my stash were attached to the top using brads. I handstitched the edge of the pocket and in between the tag sections using embroidery floss (more stash that I need to use up!).

I love these Doodlebug Design Inc. papers and use them (in all of the color combinations) in a lot of my layouts and projects! I also used a lot of Core'dinations cs in this layout.

Next month's SG Design Team Challenge: create a layout using a Fairytale Creations Chalking Template.

Happy crafting,
Barb!

10/09 Scrapbooking Goodies' DT Challenge: Using Core'dinations Cardstock


This was my Scrapbooking Goodies (SG) Design Team submission for October 2009.

The challenge was to use a non-scrapbooking tool to distress or alter Core'dinations Cardstock. I used one of my son Zac's lego blocks under the cardstock and sanded the surface, leaving a very cool checkered design.

I welded the title words in Design Studio using the Alphalicious cartridge and shadow feature, then layered the base letters on the welded shadow. I love that cartridge... it's just so fun and playful! The circles and triangle in the corners were the negative pieces left after cutting the "o"s and "4" - I love to use my scraps!

Next month's SG Design Team Challenge: an "About Me" layout.

Thanks for stopping by and...

Happy crafting,
Barb!