Showing posts with label Hot off the press. Show all posts

Wednesday, March 31, 2010

Practical Scrappers DT Challenge: Use Rub-ons

This week's challenge at Practical Scrappers is to use rub-ons - something that I, admittedly, am NOT a fan of. I bought some to use for the challenge and didn't end up having time to create a layout around the rub-ons - which is what I would have to do in this case. I had been working on scrapbook layouts with non-scrapping friends last week. We started on Monday and needed an entire book done before Friday - it was a moving away gift for a family that are dear friends of mine and Will (the husband) was leaving on Tuesday morning, so his surprise going away party was on Friday night.

On Friday while working on a "Friends" page and cooking up a huge batch of gumbo for the party, I decided to use some old rub-ons that I've had for a while on the layout, which I was able to submit as my project. Talk about getting it done on the 11th hour!

Here is my 2-page layout "You've got a friend in me".

Left page:

here's the right page:


The left page has an oversized tag cut from tags, bags, boxes and more. I printed the lyrics to the Randy Newman song "You've got a friend in me" (we all know it from Toy Story) and used that as the journaling tag. I knew this going away party was going to be emotional and our friend Will needed something to remind him of his friends here in Florida. I didn't want the journaling to be too personal - he's a tough guy, so I opted for this song. The photos on the layout were from various times we all spent together at a bar where Will's wife (and one of my best friends) Krissy works. My boyfriend plays guitar and sings there on Sundays so the music theme seemed appropriate. It went over well - and there were a lot of tears.

On the lower right corner of the left page, there is a mini album, which is held closed by sheer yellow/gold ribbon tied in a bow. It's folded accordian style and houses 7 photos between the 2 sides of the pages. Here's a close-up of it opened:


The right page also holds a bunch of photos, but this time I used a tag holder that I find quite handy, unique and fun! I've used both of these multiple photo LO techniques on a previous layout (Emily the Destroyer) but both LOs look so different - it's just a great way to get a lot of photos on a 2-page spread.

The tag holder was made from a #10 business size envelope that was folded, inked, & covered with coordinating paper. It holds 4 tags and each has a photo on both sides. I discovered this technique by visiting Following the PaperTrail. Laura has a lot of very cool things on her blog... check her out when you get a chance. You won't be disappointed! Here's a link for a YouTube video with directions on how to make the tag holder.

Here's a close-up of horizontal tags that slide into the tag holder:


and here is a close-up of the vertical tags that slide into the top of the tag holder:

Keep in mind, more tags can be added, I just chose to have 4 double-sided photo-tags for this layout. The final photo count on this 2-page layout: 18! Had I chosen to make the journaling tag a lot smaller I certainly would have been able to include at least 1 more photo on that page. In fact this layout had the potential to hold well over 20 photos without crowding them all in - gotta love that! I used Great Big Brads from Hot off the Press with quirky little HotP rub-ons on 2 of the photo tags and 1 on the journaling tag. The tags were all distressesd with Tim Holtz distress inks (spiced marmalade & dried marigold).

The striped paper was from Reminisce. It's double sided - the quilt-pattern you see under the vertical tags is on the reverse side.

Title letters were cut from Alphalicious, the music notes were from Hannah Montana and the tags were all TBB&M.

That's it for this week. I'll be celebrating my birthday this weekend so hopefully I'll have a few funny pictures to scrap in the coming weeks. My mom is doing her annual Easter Egg hunt on Sunday for the kids so there's another photo-op!

Thanks for visiting my blog and be sure to check out Practical Scrappers to see the great rub-on projects my DT sisters have created this week.

Til next Wednesday...

Happy crafting,
Barb

Wednesday, March 24, 2010

Practical Scrappers DT Challenge: Use something that you've had in your stash for over a year

Spring is here so it's time to clean out your storage bins & drawers, dust off those packages of stickers that you HAD to have but never used and use up those patterned papers that you've been holding on to for that special page!

This week Practical Scrappers wants you to dig into that stash and use something that you have had for over a year. It can be a product or tool and you only need to use one item to qualify. The Grand Prize winner will receive two free digi stamps from The Stamping Boutique. The deadline to enter is 5 p.m. on Saturday, so hop on over to Practical Scrappers and submit your project. My Design Team sisters and I would LOVE to see what's been hiding in your stash!

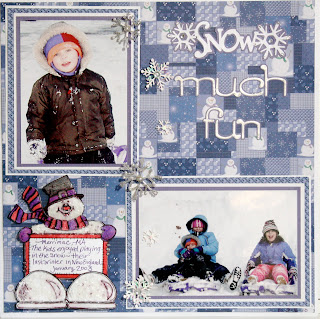
Here's my "Snow Much Fun" layout for this week:

I have had these papers from Hot Off The Press' "Mixing Christmas Papers" since 2002 and it's really great to use them! I wanted to bring in a little purple from the photos and the patterned paper so I matted the 2 photos in purple, then white, then a coordinating HotP paper from the same collection and finally another white mat. I felt that because the geometric pattern on the paper was so busy, the quadruple mats helped to tone it down, while still tying it together.

The glitzy snowflakes cascading down the layout are from Jolee's Boutique - another item that has been floating around in my stash since about 2003. I love how well the silver & pearl beads and clear rhinestones play with the cool blues and purples of the papers.

Because this month's sponsor is The Stamping Boutique, the DT members all were asked to use a digi stamp on a card or layout during the month. I chose an adorable Snowman Scrapbook Journal, which helped me do another snowy layout from our old home in New England. I colored the happy fellow with colored pencils, then applied Glossy Accents on him. While the Glossy Accents was still wet, I sprinkled a healthy dose of Martha Stewart Crafts "Snow" glitter all over to give him a frosty look. This glitter is a lot chunkier than normal glitter so it does look like ice crystals - take a closer look:


After the first coat of glossy accents dried, I applied more to his hat, scarf & mittens as well as along the exposed edges of the journaling block and the bottoms of his feet. I cut the entire digi stamp out and used 3d foam dots to affix him to the page.

The title letters ("Much Fun") are from the Tear Drop Cricut cartridge and were welded using my Gypsy and "Snow" is from Gypsy Wanderings. I applied Liquid Pearls White Opal (I've had since '08) to the tear drop letters and Distress Rock Candy Stickles to the "Snow" title. I also added some additional rhinestone bling on the snowflakes for a little extra sparkle.

I think I'm done with snowy layouts for a while. The sun is shining here in Southwest Florida and it looks like we're back to our normal 80 degree temperatures for a while... sounds like there may be a few beach days with my girlfriends along with some bright beachy layouts in the coming weeks!

I hope the sun is shining, the snow is melting, the rain has stopped and the crocuses are popping up where you are! Thanks for visiting my blog and...

happy crafting,
Barb

Thursday, February 25, 2010

Moriarty Girls

I've been procrastinating doing this layout - not knowing exactly where to begin. I feared not being able to do it justice in a classy vintage style. After taking the "heritage" plunge with Dad's sisters, I jumped into "Moriarty Girls" without looking back (no pun intended)!


Before I get into the details of the layout, I have to describe the telephone conversation I had two days ago with my 84-year-old mom Dorothy (pictured in the back row far right in the photo above). I had told her about the layout I did for the photo of my dad's sisters and told her that the next page I was working on was using a photo of her and her sisters. Without me going into much detail about the photo with her, she began to tell me this story:

"It was Easter Sunday and my sisters and I were at the (Lawrence) Common. Anna was wearing a large hat because Lance had accidentally closed a door on her hand and she had been crying so she wanted to hide her eyes. Mary was wearing a brown checkered suit that she had for a while, but the rest of us all were wearing brand new outfits. It was before your father and I got married so I was able to afford an expensive outfit. I really loved that one... the jacket came to a point in the back, almost like tails. Grace had her hair up in a rat's nest - that's what they called it back then, you know. It was like a roll with cotton batting in it that we would wrap our hair around. Joan was standing in front of her mother, Rosemarie was sitting next to Mary and Annemarie was sitting on Mary's lap. Lance took the picture and it had to be around 1946 because your father and I got married in '47."

WOW... all these details without having the photo in front of her. She actually went into more detail describing the colors of each of their outfits but I was blown away by her recollection of a brief moment nearly 64 years ago and didn't write it all down as I sat looking at the black and white photo.

These sisters were the strongest women I have ever had the pleasure of knowing. They endured hardship, suffering, health issues, as well as enjoyed good times all while remaining to be best friends throughout the years. My Mom is the only one left to tell these stories and I hope to document as many of them as I possibly can on layouts such as this to share with my family and relatives.

Here are the materials used in the layout:

Patterned papers: Hot Off The Press "Busy Scrapper's Solution Vintage Papers"

Inks: Tim Holtz Distress Ink: Walnut Stain, Pine Needles & Aged Mahogany
VersaMagic: Pink Petunia

Paper Roses: MyMoments (Pink)

Sheer ribbon: unknown

I used an Anna Griffin technique for the pleated border as well as the photo corner treatment.

The journaling was placed on top of more paper pleats and I used 3D foam dots to adhere it to the layout. The journaling was done on my computer using "American Typewriter" font. I also added additional 3D foam dots inside some of the pleats to give it more definition.

I hope that I did these remarkable ladies proud with this layout.

Thanks for stopping by. Let me know what you think by leaving a comment.

Happy crafting,
Barb

Wednesday, February 24, 2010

Practical Scrappers DT Challenge: Use Stamps

It's Wednesday so that means it's time for me to post another project for Practical Scrappers!

This week's challenge is Stamps! You can use any kind of stamp - digi, rubber, acrylic, foam - we want to see all of them! This week there will be a top three and a Grand Prize Winner. The Grand Prize winner will receive bonding powder and a Stampee foil of their choice. What's Stampee foil you ask? Go to Practical Scrappers and check it out - they are a brand new sponsor of ours and we are delighted to have them! PS will be featuring projects with Stampee Foil every day this week!

For my project, I decided to get my green on in anticipation of St. Patrick's Day and here is what I came up with:


The polka dot paper was from Hot off the Press. All the little Irish themed stamps were from Studio G. I stamped the images onto green CS with black Stazon, then heat embossed them with clear embossing powder. After I had enough of the little images stamped and embossed, I pulled out my trusty craft sheet, tapped a tiny bit of green Perfect Pearls onto it, then misted my craft sheet with water. I mixed the pearls and water, then painted inside the embossed areas - the embossing acts as a resist so it rolls right off the stamped image plus it also contains the pearly paint mixture inside the embossed lines... cool! I continued the process with white and gold Perfect Pearls until I had all the images painted. At this point I chose to hit the painted images with a heat gun just to speed up the drying but you can just let them dry on their own.

Here is a close-up of how shimery and fun the Perfect Pearls look:


I cut the images out in 1 1/4" squares then matted them onto 1 1/2" black squares. Now what would a St. Patrick's page be without a wee litte bit o' the gold??? I had some leftover gold coin confetti and matted 4 pieces onto green then black squares of cs, then alternated them with the stamped images onto a white strip of cs, which was also matted on black leaving just enough room above the blocks for a little journaling. Three of the stamped squares were adhered to the border with 3D pop dots and the gold coin blocks were just glued straight onto the border, adding a little variety.

I used 3d foam dots on the remaining 8 stamped images and put 4 on each side of the page giving the layout a very symmetrical look - very different for me!

The title letters were cut using my Cricut and San Serif cartridge, the shamrock was from Paper Doll Dress Up. To get the shading and shadows just right on the shamrock I went over the edges of the cut BEFORE removing it or the leftover paper from the mat with a fantastix loaded with black ink. This is such a simple way to achieve an inked edge look to any cut without having to try to run an inkpad over the edges. All you do is simply trace the cut with the fantastix until you get the desired look. I remove the image, check it to see if the ink covers the edges enough and if not, replace it on my mat where it was cut and add more ink. As the ink is removed from the fantistix, I like to blend the inked edges up onto the cut very subtly to give the cut a more realistic 3D look. I also use this technique to add shadows to my cuts, which you may be able to see on the right side and bottom of the shamrock's stem.

I'm very excited about next week's challenge at PS... but I can't tell you what it is yet! Make sure you come back and visit my blog next Wednesday and check out my DT challenge layout... I really LOVE it and am looking forward to sharing how you can get a very cool look using just a few supplies and some Bazzill CS.

Thanks for stopping by!

Happy crafting,
Barb

Wednesday, February 17, 2010

SOUS 2/12 Sketch - my first submission

So, I think I'm getting a little more confident with my work. I mean I LOVE my layouts and other people seem to like them too. I just have been hesitant in submitting anything other than my design team work... until today.

I recently saw this sketch on Stuck On U Sketches:


This is a direct quote from SOUS:
"This week we have chosen one created by Liz Qualman. You can visit Liz and see more of her work at http://lizqualman.blogpsot.com/. We hope you will come back next week for a VERY special treat from Liz to us for you! You won't want to miss it! But this week we have a little TWIST on the challenge. You must use the sketch AND you must use RED or PINK on your layout! It doesn't have to be valentine-ish... just use one of those colors somewhere on your project..."

As soon as I saw it I knew exactly what I wanted to do with it! I had this amazing photo of my youngest daughter and it was perfect for this sketch challenge!

Here is my take on Liz Qualman's sketch:


The patterned papers were from HotP (striped and polka dot), Doodlebug Design (checked) and the speckled is unknown :(

I used my favorite Cricut font cartridge Alphalicious for the title letters - it just adds to the playfulness of the layout, don't you think?

Practical Scrapper's challenge for this week is flowers so I thought I would keep the theme going by using some homemade sunflowers for the embellishment.

After cutting the flower centers and stacking them, I used "pine needles" and "walnut stain" distress ink applied to a Fantastix to tap ink on the jagged edges, softening them a bit and giving them a more realistic look. Here's a close-up of the flowers:


I'm really thrilled to finally have this photo in my scrapbook where it belongs instead of in a box full of photos where nobody can see it.

Let me know what you think!

Thanks for stopping by and...

Happy crafting,
Barb!

Wednesday, February 10, 2010

Practical Scrappers DT Challenge: Use Brads

This week's challenge at Practical Scrappers was to use brads, something we paper crafters all have and use often. Because my projects are posted on Wednesdays, I also have to use my Cricut when designing my projects - a bonus for me as I love to use my Cricut!

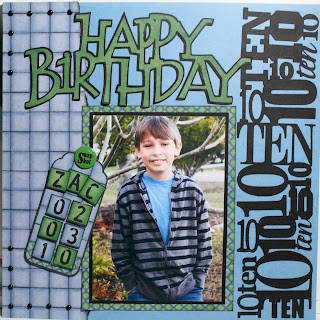
Here is my completed layout:


I chose to use some paper that I have had for years in order to get a masculine look for this layout marking my son's 10th birthday. The paper is from Hot Off The Press' Busy Scrapper's "Boys to Men" collection. The cool thing about these collections are that they are arranged in the book so that papers coordinate nicely and also include tags, letters and other embellishments that make creating layouts quick and easy.

The tiled paper on the left side was torn and inked, then I placed 14 black mini brads along the left top and bottom corners to accentuate the lines in the paper. I attached the pre-made tag to the layout with a Great Big Brad that I altered by adding a "Snap Shot" rub-on to the top. The letter tiles used on the tag were also from the HotP collection.

The "Happy Birthday" title came from the Beyond Birthday's Cricut cartridge and the very cool "10" border was from Graphically Speaking, a cart that I have to admit I have never used before but will use often now that I have explored all it has to offer.

Don't forget to submit your own project at Practical Scrappers. This week we will have a winner for the project that uses the most brads, a winner for the most creative use of brads, and a winner for the favorite project. The design team is looking forward to seeing what you come up with!

Thanks for stopping by and...

Happy crafting,
Barb!